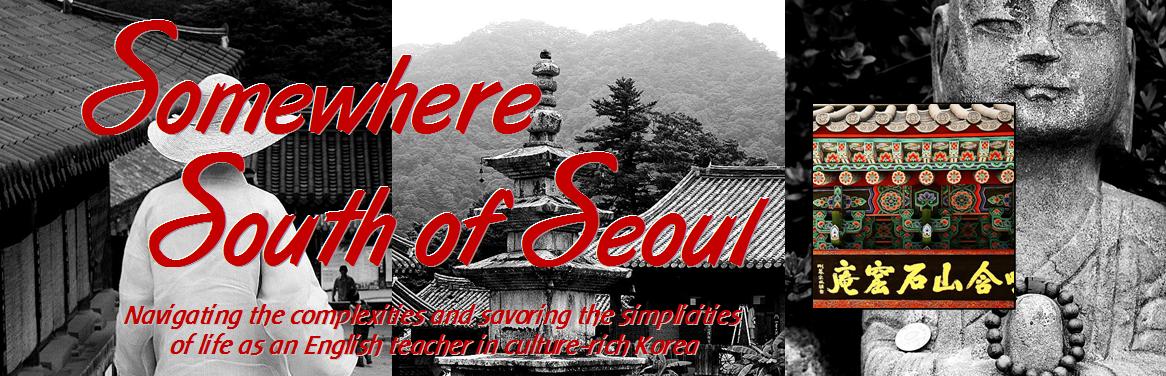
 I didn't have any flashy programs like Adobe Photoshop at my disposal, but armed with my Microsoft 2003 Suite, a handful of favorite digital pics, and Google's Picasa program, I was able to put together an eye-catching header that both speaks to the content of my site and leaves a lasting first impression on my visitors (or so I hope).
...And if you're reading through this posting, I'm going to assume it's because you like what to see at the top of my weblog and you'd like to know how to recreate it for yourself...
I've prepared the following tutorial to help you achieve a professional-looking header that is customizable to your specifications. Your graphic header will include:
(1) a 3-photo background graphic image (with the option to wash-out the image),
(2) a title and description, and
(3) a foreground photo (optional).
As for the instructions that follow, I'm assuming that you have at least a basic working knowledge of the following programs:
-- Picasa (v2.7), by Google (download here)
-- Microsoft Word 2003 (I haven't tried this with OpenOffice freeware, but it might suffice; download it here)
--Microsoft Paint (included with Microsoft Windows, look in Programs\Accessories)
It's really not as difficult as it might first look, though be prepared to spend a little time tweaking everything from font sizes and colors to the finer nuances of cropping and photo detail.
 Part I: Creating the Background Photo Image
 - Using Picasa, select three (3) photos from your digital collection that create the feel and style you at going for. Modify the photos to your liking (I desaturated all three of mine to create a black-and-white image that would pop against my red blog background).
- When you are finished with your photo edits, crop each image using the 4x6" crop setting, and export the images (File --> Export Picture to Folder). Follow the prompts to designate output location. Resize to 1024 megapixels, and choose your Image Quality setting (for the header you are viewing, I used the "Normal" setting). Hit "OK" to confirm and close.
- Open Microsoft Word. From File --> Page Setup, select "Landscape" from the Margins tab, and set the margins to 0.7" on each side. Select "Legal" from the pull-down menu on the Paper Size tab. (With these settings, I am able to view the entire 3-photo spread with MS Word at set at 100% zoom.) Hit "OK" to confirm and close.
- Insert each photo by selecting Insert --> Picture --> From File, and browsing to the image for insertion. As you insert each image file, they will append so that the three images are juxtaposed on the document.
NOTE: It is important at this point that you are able to view the entire layout of 3 photos on your screen without scrolling. If you are unable to view them completely, double-click on each photo and rescale by entering a smaller % for height or width under the "Size" tab. (If "Lock Aspect Ratio" is checked, the other dimension will automatically scale to match.)
NOTE: If you are NOT creating a washed-out image (See Part II below), make sure to right-click each photo image and select Format Picture --> Layout --> Behind Text, so that you can create a title and description as an overlay to the background image.
 Part II: Create a Washed-Out Background Image (Optional)
- Locate the print-screen function key (labeled "Prt Scr" or similar) on your keyboard. (Mine is located at the top of the keyboard, between "Pause | Break" and "Insert.") After first making sure that the photos are deselected and the cursor is outside the margins of the photo images, press "Prt Scr" and paste into Microsoft Paint.
- Use your mouse to drag the image to the top left corner of the screen. Crop as follows: (a) Click the "Select" button (looks like a broken rectangle) on the toolbar. Drag your mouse over the image so that the desired image is within the dotted lines. Press Ctrl+X, then Ctrl+N, select "Don't Save," and then Ctrl+V. If any white area is showing beneath your image, click the bottom right corner of the white space with your mouse, and drag it to match the bottom right corner of your image. Save the image.
- Hit Alt+Tab to return to Microsoft Word. From the Format menu, select Background --> Printed Watermark. Select "Picture Watermark" and browse to the location of your Microsoft Paint image. Scale should be set to "Auto", and make sure "Washout" is deselected. Hit "OK" to confirm and close. You now have a muted background image (hit return several times until your cursor is on page 2 to view it). From page 2, you can begin creating your title and description as an overlay to the background image.
Follow this link for an example of a washed-out background image that I created for another weblog of mine.
 Part III: Creating The Title and Description
 - Begin typing the text of your title and description over the background image.
NOTE: There are hundreds of fonts available for download at 1001 Free Fonts. Installation of new fonts is fairly straightforward, though beyond the scope of this article. For more information on how to install fonts in Windows Vista, follow this link. - Experiment with multiple fonts and other formatting options, such as expanding or condensing text (go to Format --> Font, select the "Character Spacing" tab, then select Expanded or Condensed from the Spacing drop-down menu). Or, try font effects such as embossing or engraving (check to select or de-select from the "Font" tab).
 Part IV: Creating a Foreground Photo (Optional)
For added dimension and visual effect, consider adding a foreground photo to your header. It is simple to do, and can add quite a bit of visual interest to the finished product.
- Select a photo from Picasa to use for your foreground photo.
- Using Picasa, modify the photos to your liking.
- When you are finished with your photo edits, crop the image to your desired size (I used the "custom" setting to achieve a square image), and export the image (File --> Export Picture to Folder). Follow the prompts to designate output location. Resize to 1024 megapixels, and choose your Image Quality setting (for the header you are viewing, I used the "Normal" setting). Hit "OK" to confirm and close.
- Hit Alt+Tab to return to Microsoft Word. Insert the photo by selecting Insert --> Picture --> From File, and browsing to the image for insertion. Right-click the image, and select Format Picture --> Layout --> In Front of Text, then drag the image to your desired location.NOTE: It is important at this point that you are able to view the entire layout of 3 photos on your screen without scrolling. If you are unable to view them completely, double-click on each photo and rescale by entering a smaller % for height or width under the "Size" tab. (If "Lock Aspect Ratio" is checked, the other dimension will automatically scale to match.)
These steps are nearly identical to Part II, Steps #1-2 above for creating a washed-out image.
- Locate the print-screen function key (labeled "Prt Scr" or similar) on your keyboard. (Mine is located at the top of the keyboard, between "Pause | Break" and "Insert.") After first making sure that the photos are deselected and the cursor is outside the margins of the photo images, press "Prt Scr" and paste into Microsoft Paint.
- Use your mouse to drag the image to the top left corner of the screen. Crop as follows: (a) Click the "Select" button (looks like a broken rectangle) on the toolbar. Drag your mouse over the image so that the desired image is within the dotted lines. Press Ctrl+X, then Ctrl+N, select "Don't Save," and then Ctrl+V. If any white area is showing beneath your image, click the bottom right corner of the white space with your mouse, and drag it to match the bottom right corner of your image. Save the image.
 Part VI: Uploading the Header to Blogger
- While signed in to Blogger, select "Layout" from the Dashboard menu for the blog that you wish to customize.
- On the "Add and Arrange Page Elements" page (under the "Page Elements" tab), select "Edit" from the "Blog Title" box. Under "Image," select the option "From your computer," and browse to your location. Under "Placement," select "Instead of title and description," and hit SAVE to confirm and close. (You may also opt to select "Shrink to Fit," though I have had better luck approximating the dimensions on my own.)
- After the image has been uploaded, you can PREVIEW your blog, or SAVE and view your blog with the saved changes. Congratulations! You did it!


4 comments:
Thanks for the post! Good stuff.
As an FYI, there are a few great free and open source graphics applications that I use everyday as an alternative to the expensive Adobe products.
GIMP
http://www.gimp.org/
Inkscape
http://www.inkscape.org/
Xara
http://www.xaraxtreme.org/
Thanks for the feedback -- and I appreciate the links. I will definitely check out the links you posted. They're all new to me! I'm sure they'll be of help to other readers too.
Hi- I have created my own header but when I publish it, it is not centered and is outside of the border box see: www.snapdragonphotography.blogspot.com. Do you know how to fix it?
Hi Moxie! :)
I just found your blog while I was looking for ways on how to create a custom header for blogger.
I was really fascinated with your contents and when I got to check your profile, it inspires me to know that you love going to other places and being passionate of your teaching profession.
Thanks a lot for sharing your thoughts and inspiring us! Greatly appreciate if we can connect in some ways.
Hope to share ideas with you soon.
God Bless!
All the Best,
Homer
Post a Comment