Thursday, September 18, 2008

Time is Marching On...

You know that sinking feeling in the pit of your stomach when you remind yourself of something you really need to do, and the longer you wait, the more behind you get? That's the feeling I've been trying to dislodge ever since my last major blog catch-up session. I've fallen terribly behind yet again...

Time keeps marching by, and lots keeps happening. As I've crested the three-month mark for my time here in Korea, I realize that some things (namely, ME) don't change the world over... I am pretty much the same person regardless of where in the world I happen to be. So it shouldn't be too surprising that I've managed yet again to create a mountainous list of goals, projects, books to read, topics to study, places to go, and things to experience while in Korea that have gotten me running around in circles. I seem to think I am super-human and have at my disposal a wrinkle in time that allows me to elasticize my day into 59.2 hours instead of the customary 24.
It's time to re-evaluate and prioritize, I suppose, so that I feel a little better about what I'm actually accomplishing.

In all fairness, a lot has transpired since I last wrote:
  • I led my first all-adult English class for some of Seosan's well-known doctors (which subsequently folded when they decided my rate was more than they were willing to pay).
  • I gave my weblog an entirely new look (which was a lot more time-intensive than I had imagined, but I'm really happy with the outcome)
  • I moved to a new apartment (which, though smaller, is a much sunnier, happier place to be). My dungeon days are over :)
  • I traveled to Seoul (yes, actually staying overnight this time) over the Chuseok (Korean Thanksgiving) holiday weekend, and had a great opportunity to see a unique blending of modern and traditional Korean life as families celebrated around me.
  • I hosted a traveler visiting from Germany, who is making her way through Mongolia, China, and now Korea as part of a gap year experience before returning to her home country to pursue her career.
  • And now, I am trying to get back to some sort of normalcy this week, meanwhile preparing for the bi-monthly written report-and-grading fest which usurped so much of my time two months ago. (I'm hoping I'm a bit more efficient at it this time around, but time will tell).
While there isn't any way to make up for lost time over the past few weeks, I'm hoping to make up for my absence of entries with a peace offering -- I have just finished uploading several new albums to my Flickr account, which includes a whole album of Chuseok festivities (including little children in traditional dress, playing traditional games, making traditional foods, and other fun stuff). And while I won't make any promises, I'm going to TRY to get back around to writing up a bit more about the foregoing events, particularly the Chuseok holiday, so that I can share with you a bit of what I've learned about this important Korean holiday.

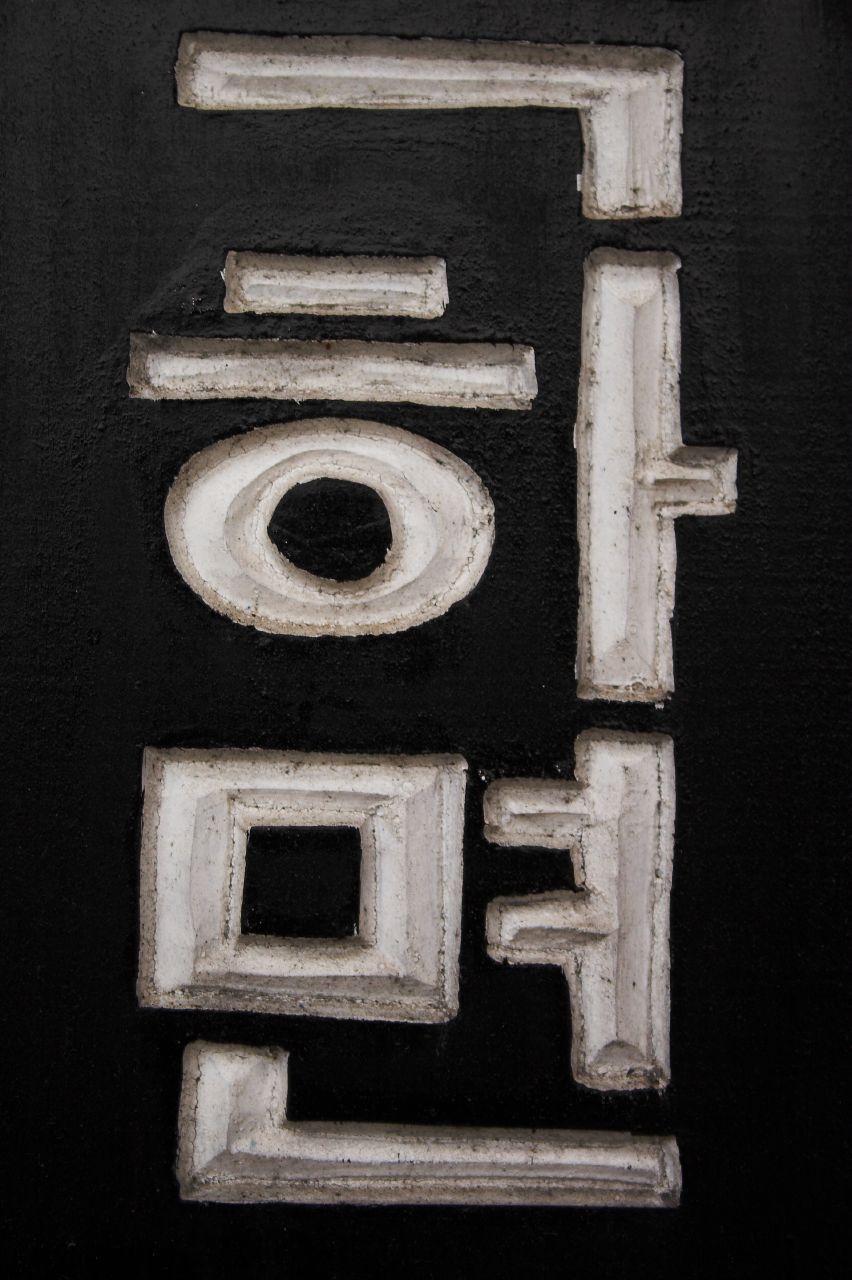
And now, I'm behind on my Korean homework, so I'm off to practice some more hangul before starting work for the day! Have a wonderful day, everybody, I'll write again soon!

Saturday, August 30, 2008

Does This Incense You?

I recently received an email from a group called NowPublic which runs news stories about current events (submitted by members in a similar vein to Wikipedia, from what I can tell). They had written to request the use of a photo I recently took in an article entitled “Incense Gives You Cancer, So Pray Less.” The title caught my interest, and my ego had been properly stroked with the request to publish my photo, so of course, I dropped in to take a look at the site.

The article presents an interesting conundrum for lovers of incense the world over and, as was obvious from the comments generated on the site, it managed to strike a nerve. Two readers even went so far as to refuse to share their photos on the grounds that the author’s tone was disrespectful and he was spreading baseless rumors. Ouch.

I'm currently living in Korea, where incense is a part of the religious tradition for a great portion of the population. It’s certainly not as omnipresent here as it was in Taiwan (where I also spent a year working as an English teacher), where the heavy scent of burnt offerings would spill from street-level shop fronts and chase you down the sidewalk. But if you visit the grounds of any Buddhist temple and peer respectfully inside, you will see faithful followers lighting joss sticks and beginning their successions of bows as the thick temple air swirls around them.

I find myself turning to the sticks when I’m craving the scent of their musky perfume, or the calming effect incense brings as I watch its feathery plumes of smoke meander through the air. It’s a somewhat entrancing, and certainly pleasant, experience, and the article didn’t dissuade me at all from continuing my incense tradition. I'm of the camp that most anything done in excess can't be good for you, but I have serious doubts that my infrequent use of incense could cause any more long-term damage than the many vices so easily accepted by mainstream culture.

I appreciated the comments of one poster who said,

“Probably inhaling any kind of smoke can cause cancer, but I also believe that cultivating a meditative state of mind, through meditation or prayer or what you want to call it, reduces the risk of getting cancer from anything. As with everything else; find a balance.”

In the end, I did opt to add my photo (you can see it here)... although the other 174 photos already linked the article proved to undermine my short-lived ego boost. I rather doubt that worshippers will start cutting back on incense usage in the way that dieters restrict their calories, but it doesn’t hurt to be reminded that our health is, to a large extent, affected by our environment.

Western Indulgence and Peanut Butter Pancakes

It has been a week a Western indulgence for me. Call it what you like, but I think of it as my unique way of experiencing the culture shock that is bound to hit all foreigners away from home after a months abroad. While homesickness and loneliness haven't made an appearance (and I say that in great hopes that they'll keep their distance), my cravings for the foods that shaped my American appetite have increased exponentially over the past week or two.

I managed to hold my ground for long enough, I figured. So, this week, I gave in to my wanton whims and traded in my chopsticks and healthy Asian fare for a true slice of the SAD (Standard American Diet, that is). My soy sauce and pepper paste didn't even make it out of the fridge this week.

... Beginning with an overdue lunch at Pizza Hut with new friend Elana, a Canadian gal teaching at a university in neighboring Unsan, where we systematically dismantled and digested a cheese-laden pineapple pan pizza (her half with Canadian bacon, of course)...
... Picking up speed with a mid-week plate of pan-fried potatoes, sliced super thin and lightly fried with a dousing of salt, pepper, and vinegar...
... Building to a steady roar yesterday with a late-night run to the mini-mart across the street for a box of chewy chocolate chip cookies...
... and celebrated with a grand finale tonight, an utterly decadent twist on the familiar weekend breakfast plate of down-home pancakes (which is my true motivation for confessing this embarrassing display of complete and utter calorie denial).

Somewhere between my mouth-watering recollections of lazy Sunday brunches at home and the availability of Korean kitchen staples, I managed to strike a delicate balance, and emerged from my mini-kitchen tonight with a plate of syrupy goodness that really deserves to be shared. And repeated.

And I've decided that this is perhaps a bit more of what cooking in Korea is about for me, after all -- not a tossing aside of my culinary heritage (which is more an eclectic mix of the world's cuisines than straight American cooking anyway), but as a workshop for me to experiment with the added dimensions of Eastern influences in my cooking repertoire.

I had soy milk in my fridge tonight, a tub of raw peanuts in my cabinet, not an egg or stick of butter to my name, and an intense urge to sink my fork into a pile of pancakes. Feeling adventurous, I started pulling random baking ingredients out of my cupboard -- a bag of vanilla-flavored powder, ground cinnamon, oil, flour, baking powder, some terribly dark and granular brown sugar, and the remnants of a jar of peanut butter that I had paid top dollar for at the local grocery store a few weeks ago (I confess, the absurdity of paying $5 for a small-ish jar of generic PB completely escaped me at the time). Maple syrup was out of the question, though I did have a bottle of Korean malt syrup which was sweet enough to do the trick.

I got to work measuring and mixing up a bubbly bowlful of brown-tinted batter, using a recipe for eggless pancakes (vegan-style) as my starting point. The taste of roasted peanuts had been my inspiration, so I decided to layer the cakes coming hot off the griddle with a thin layer of peanut butter, and top the whole lot with a dousing of syrup and a handful of crushed-up peanuts. It turned out to be an absolutely winning combination.

For the peanut lovers among you (and especially anyone staring blankly at their Korean kitchen cupboards wondering what to do with your IHOP cravings), give this a try:

Peanut Butter Pancakes (Serves 2)
1/4 cup raw peanuts, chopped (divided)
1 cup flour (spoon-sifted)
2 Tbsp sugar (I used dark brown, though any kind should do)
1 Tbsp baking powder
1 tsp vanilla powder (sub with vanilla extract)
a sprinkle of salt
a dash or two of cinnamon
1 cup soy milk (you can probably sub with regular milk, though the soy adds a nice flavor)
2 tablespoons oil (nothing strong-flavored, EVOO and sesame are out)
2 Tbsp peanut butter
1/2 cup syrup (maple works, as does Korean malt syrup)
Dry-roast the chopped peanuts in a griddle over medium heat until lightly toasted. Set aside to cool.
Combine flour, sugar, baking powder, vanilla powder, salt, and cinnamon in a small bowl. Add milk, oil, and half of roasted peanuts; beat with a fork until smooth. Pour batter onto a hot, oiled griddle (in ~1/4-cup increments).
Flip quickly when bubbles break the surface, and the edges are a bit stiffened. Cook one minute longer, then transfer to a serving plate. Repeat with remaining batter.
As you stack the pancakes, smoothing a thin layer of peanut butter over each cake. When finished, spoon the remaining chopped peanuts over the pancake stack, and douse with syrup. Serve warm with a glass of soy milk. Enjoy!

Monday, August 25, 2008

A Cool Wind Blows

I left school a little after 9:00 this evening, all of my students long gone with their carpools and neighborhood walking groups. I was the last to leave, as is often the case -- Sunny (our head secretary) and Terry (the boss's wife and my co-teacher) are anxious to get back to their families, and I am just as anxious to quickly finish grading the day's papers and update the gradebook before going home to unwind in solitude. (I've long since abandoned the idea of bringing home my "teacher work," and I prefer to keep it that way.)

So again tonight I shut off the lights, heaved the heavy glass door closed, and locked it shut. As the magnetic lock clicked into place, it dawned on me. There was a change in the air. The breeze scuttling around behind my back was a cool one. For a moment, I wished I'd brought along a sweater. Fall was on the wings. The dogged, miserably damp and heavy heat of summer was all but over... How has the time gone so quickly?

When I arrived in Korea, it was barely summer. I remember lying in the guest bedroom in my host family's 10th floor apartment, pulling the weighty cotton blanket over my ankles and toes as a cool breeze swept in through the windows and tiptoed across the floor. Within weeks, I had moved in to my own apartment, and was spending the wee morning hours kicking the bed covers as my dainty oscillating fan tried to keep up with the lingering, thick heat.

And now the changing of seasons is whispering again, and it seems impossible that an entire summer has slipped away without my scarcely being aware of it. It feels as though summer was somehow pulled right out from under me, though I know that can't be so.

It was just five days ago that my little brother flew back to Utah to start the fall semester at BYU, where he is working on his undergrad. It was just yesterday that my parents and baby sister pulled out of the driveway together, for the last time, heading north along the interstate taking them to their new hometown, on the outskirts of Boston. They're relocating just in time for Emily to start her senior year in high school. And it was today that the bulk of my students resumed Korean public school after a month-long summer break.

Change is in the air everywhere, it seems, stretching all the way from this side of the world to the other, touching even my roots back home. Change has been blowing through Seosan as I've had to say goodbye to yet another good friend who helped to make my first few months here memorable, and to several students I adore who have been admitted to EGA-II. And change will continue to keep me on my toes, I am sure, as the months march on. New friends to make, new students to teach, a new apartment to settle into, a new season to greet. Bring on September, I'm ready for another cool wind to blow...

Saturday, August 23, 2008

How Do You Eat an Elephant?

It has been a restful weekend so far, something I've been desperately in need of after a long week. Aside from my normal plate of teaching 40 classes this week, I managed to pull two all-nighters, crashing after the sun came up for a few hours before going off to work. (I'm not quite sure either time how I thought I would last through the next day of teaching until 9 PM, but somehow or another I survived... and I suppose I should give credit where credit is due -- thank you, instant coffee -- you might be too sweet, you might be watered down, but you did the job!)

I have to laugh, though, because this ridiculous refusal to follow a normal sleeping schedule like normal people do is such a perfect example of the large pattern that is my life. I have never been one of those people who was good at breaking up a big project into itty bitty pieces and then plugging away consistently at it, one day after the next. (The socially acceptable answer to the question "How do you eat an elephant?" is "One small bite at a time.")

No, I have always been the "binge-on-elephant-until-you're-ready-to-explode" type. Okay, I realize that doesn't sound too pleasant. But it's this kind of intensity and passion for what I do that I pour into my work, whether it's teaching eight-year-olds or studying Korean or trying to perfect photo images from my latest shoot. Or, in this case, writing up a dozen blog posts and giving the whole weblog a much-needed facelift. Was it worth dragging through work the next day? For me, yes. As much as I like to think I can multi-task with the best of 'em (whoever "them" are), I know I will forever and always be more of the tunnel-vision warriors who put on their blinders and charge ahead.

So today, with my blinders in my back pocket, I tried out Microsoft's Movie Maker software. I have hundreds of photos from my recent backpacking adventure in southeastern Korea that are neatly catalogued on my Flickr page, just begging for a little attention. And after visiting the weblog of Tory, the EFL teacher from California that I met while at Palgongsan, I was inspired to take a stab at making my own video. After viewing my finished work, I realized that it's really nothing to brag about. The picture quality is unimpressive, and it's truly a photo montage, as I didn't have any video to splice in between still frames. But in 4.5 minutes, I think it does a decent job of giving you a taste of Korea. And let's be honest, that's kind of the point of reading my write-ups, no?

So, without further adieu, I give you "Summer in South Korea"... :)


Note: If you're having trouble viewing this video (it has been embedded in high-quality), you can view it in standard quality by following this link.

Friday, August 22, 2008

How to Create a Custom Header for Blogger

I recently decided to give my Blogger weblog a facelift. The default title-and-description on my Minima layout just weren't cutting it anymore, and after perusing enough flashy blogs toting full-color headers, I figured I could do a lot worse and it would still be a big improvement.

I didn't have any flashy programs like Adobe Photoshop at my disposal, but armed with my Microsoft 2003 Suite, a handful of favorite digital pics, and Google's Picasa program, I was able to put together an eye-catching header that both speaks to the content of my site and leaves a lasting first impression on my visitors (or so I hope).

...And if you're reading through this posting, I'm going to assume it's because you like what to see at the top of my weblog and you'd like to know how to recreate it for yourself...

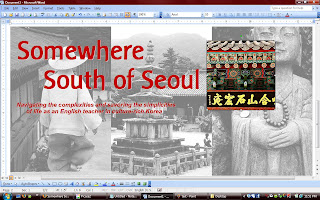
I've prepared the following tutorial to help you achieve a professional-looking header that is customizable to your specifications. Your graphic header will include:
(1) a 3-photo background graphic image (with the option to wash-out the image),
(2) a title and description, and
(3) a foreground photo (optional).

As for the instructions that follow, I'm assuming that you have at least a basic working knowledge of the following programs:
-- Picasa (v2.7), by Google (download here)
-- Microsoft Word 2003 (I haven't tried this with OpenOffice freeware, but it might suffice; download it here)
--Microsoft Paint (included with Microsoft Windows, look in Programs\Accessories)

It's really not as difficult as it might first look, though be prepared to spend a little time tweaking everything from font sizes and colors to the finer nuances of cropping and photo detail.


Part I: Creating the Background Photo Image
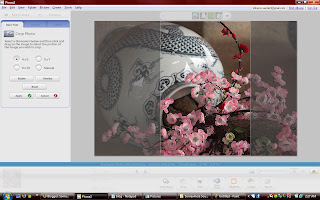
  1. Using Picasa, select three (3) photos from your digital collection that create the feel and style you at going for. Modify the photos to your liking (I desaturated all three of mine to create a black-and-white image that would pop against my red blog background).
  2. When you are finished with your photo edits, crop each image using the 4x6" crop setting, and export the images (File --> Export Picture to Folder). Follow the prompts to designate output location. Resize to 1024 megapixels, and choose your Image Quality setting (for the header you are viewing, I used the "Normal" setting). Hit "OK" to confirm and close.
  3. Open Microsoft Word. From File --> Page Setup, select "Landscape" from the Margins tab, and set the margins to 0.7" on each side. Select "Legal" from the pull-down menu on the Paper Size tab. (With these settings, I am able to view the entire 3-photo spread with MS Word at set at 100% zoom.) Hit "OK" to confirm and close.
  4. Insert each photo by selecting Insert --> Picture --> From File, and browsing to the image for insertion. As you insert each image file, they will append so that the three images are juxtaposed on the document.
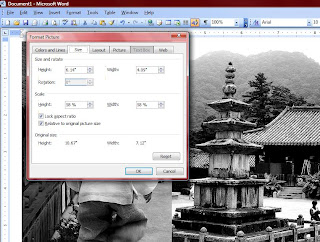
    NOTE: It is important at this point that you are able to view the entire layout of 3 photos on your screen without scrolling. If you are unable to view them completely, double-click on each photo and rescale by entering a smaller % for height or width under the "Size" tab. (If "Lock Aspect Ratio" is checked, the other dimension will automatically scale to match.)
    NOTE: If you are NOT creating a washed-out image (See Part II below), make sure to right-click each photo image and select Format Picture --> Layout --> Behind Text, so that you can create a title and description as an overlay to the background image.

Part II: Create a Washed-Out Background Image (Optional)
  1. Locate the print-screen function key (labeled "Prt Scr" or similar) on your keyboard. (Mine is located at the top of the keyboard, between "Pause | Break" and "Insert.") After first making sure that the photos are deselected and the cursor is outside the margins of the photo images, press "Prt Scr" and paste into Microsoft Paint.
  2. Use your mouse to drag the image to the top left corner of the screen. Crop as follows: (a) Click the "Select" button (looks like a broken rectangle) on the toolbar. Drag your mouse over the image so that the desired image is within the dotted lines. Press Ctrl+X, then Ctrl+N, select "Don't Save," and then Ctrl+V. If any white area is showing beneath your image, click the bottom right corner of the white space with your mouse, and drag it to match the bottom right corner of your image. Save the image.
  3. Hit Alt+Tab to return to Microsoft Word. From the Format menu, select Background --> Printed Watermark. Select "Picture Watermark" and browse to the location of your Microsoft Paint image. Scale should be set to "Auto", and make sure "Washout" is deselected. Hit "OK" to confirm and close. You now have a muted background image (hit return several times until your cursor is on page 2 to view it). From page 2, you can begin creating your title and description as an overlay to the background image.
    Follow this link for an example of a washed-out background image that I created for another weblog of mine.

Part III: Creating The Title and Description
  1. Begin typing the text of your title and description over the background image.
    NOTE: There are hundreds of fonts available for download at 1001 Free Fonts. Installation of new fonts is fairly straightforward, though beyond the scope of this article. For more information on how to install fonts in Windows Vista, follow this link.
  2. Experiment with multiple fonts and other formatting options, such as expanding or condensing text (go to Format --> Font, select the "Character Spacing" tab, then select Expanded or Condensed from the Spacing drop-down menu). Or, try font effects such as embossing or engraving (check to select or de-select from the "Font" tab).

Part IV: Creating a Foreground Photo (Optional)
For added dimension and visual effect, consider adding a foreground photo to your header. It is simple to do, and can add quite a bit of visual interest to the finished product.
  1. Select a photo from Picasa to use for your foreground photo.
  2. Using Picasa, modify the photos to your liking.
  3. When you are finished with your photo edits, crop the image to your desired size (I used the "custom" setting to achieve a square image), and export the image (File --> Export Picture to Folder). Follow the prompts to designate output location. Resize to 1024 megapixels, and choose your Image Quality setting (for the header you are viewing, I used the "Normal" setting). Hit "OK" to confirm and close.
  4. Hit Alt+Tab to return to Microsoft Word. Insert the photo by selecting Insert --> Picture --> From File, and browsing to the image for insertion. Right-click the image, and select Format Picture --> Layout --> In Front of Text, then drag the image to your desired location.NOTE: It is important at this point that you are able to view the entire layout of 3 photos on your screen without scrolling. If you are unable to view them completely, double-click on each photo and rescale by entering a smaller % for height or width under the "Size" tab. (If "Lock Aspect Ratio" is checked, the other dimension will automatically scale to match.)

Part V: Saving the Final Header Image
These steps are nearly identical to Part II, Steps #1-2 above for creating a washed-out image.

  1. Locate the print-screen function key (labeled "Prt Scr" or similar) on your keyboard. (Mine is located at the top of the keyboard, between "Pause | Break" and "Insert.") After first making sure that the photos are deselected and the cursor is outside the margins of the photo images, press "Prt Scr" and paste into Microsoft Paint.
  2. Use your mouse to drag the image to the top left corner of the screen. Crop as follows: (a) Click the "Select" button (looks like a broken rectangle) on the toolbar. Drag your mouse over the image so that the desired image is within the dotted lines. Press Ctrl+X, then Ctrl+N, select "Don't Save," and then Ctrl+V. If any white area is showing beneath your image, click the bottom right corner of the white space with your mouse, and drag it to match the bottom right corner of your image. Save the image.

Part VI: Uploading the Header to Blogger
  1. While signed in to Blogger, select "Layout" from the Dashboard menu for the blog that you wish to customize.
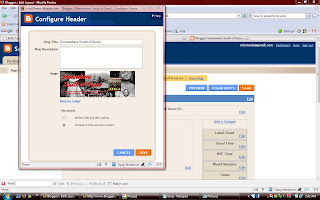
  2. On the "Add and Arrange Page Elements" page (under the "Page Elements" tab), select "Edit" from the "Blog Title" box. Under "Image," select the option "From your computer," and browse to your location. Under "Placement," select "Instead of title and description," and hit SAVE to confirm and close. (You may also opt to select "Shrink to Fit," though I have had better luck approximating the dimensions on my own.)
  3. After the image has been uploaded, you can PREVIEW your blog, or SAVE and view your blog with the saved changes. Congratulations! You did it!

Tuesday, August 19, 2008

Lost in Translation: Hangul is Hard Work

I met Kim Cheong Sun, my new Korean teacher, again today at 11:20 for my second language lesson. With last week's Korean National Day holiday falling on Friday, a week had lapsed since our first session together. But I had done my homework, and put in several hours of study time, trying to master the two pages of hangul characters and new vocabulary words she had assigned to me.

As I walked down to the school to meet her, I thought back about twenty years, to the days when I'd be walking across the subdivision to the house of my piano teacher, Dee Stoutenborough. I remember distinctly the weeks when I had really practiced hard, when I knew I had made real progress and was sure to meet with the praise of my pleased teacher. And those same familiar feelings began surfacing again -- excitement tinged with apprehension, wondering if I had done enough to earn Cheong Sun's mark of approval. (When did this "need to please" begin with me? I'm amazed to think I've never outgrown it!)

The lesson was hard work, as the language barrier between us is so incredibly thick. It is all I can do for the bulk of the lesson to try to latch on to the simplest of syllables she speaks and repeat them back. I'm not entirely sure she even wants me to repeat what she's saying, but I haven't yet learned how to distinguish otherwise. We worked through a review of last week's vocabulary, for which I earned two thumbs up and a big smile from my teacher.

Then came Part II, a drill of the final segment of hangul characters for me to memorize -- diphthongs (blended vowels) that tested my listening skills to the extreme. The difference between /yeh/ and /yae/ are negligible, but more difficult still are three diphthongs, each spelled with a unique character, but all of which seem to bear an indistinguishable /weh/ sound. God help me if I'm ever going to learn how to distinguish between the three!

The word study that followed should have seemed a natural progression from the diphthongs... only, I had a dozen very similarly-shaped characters swimming around in my head and was at a loss to keep any of them straight! Rather than sounding out any of the syllables on my own, the exercise turned out to be another parroting session: I watched and listened intently while Cheong Sun formed the word, and then tried my darndest to replicate it at least close enough that my attempt was passable. From the final tally of remediated pronunciations, I don't think I did so hot.

Being the language student of a teacher who speak next to nothing of my native tongue has connected me in new ways to my English students. It's discomforting and somewhat discouraging to leave a 50-minute lesson feeling as though I've probably managed to comprehend about 5% of it. Sometimes I forget that I'm teaching language learners, and fall back into my normal clip and pace of talking and giving instruction. But the truth of it is, it can be extremely exhausting to be sitting in the student's seat, fighting over comprehension of every word. I have a new appreciation for my students.

So I'm going to keep plugging away at Korean. I still feel as though my brain has next to no constructs to begin sorting out and making sense of this foreign language I am trying to wrap my head around. But I'm not a quitter. I'll work on these hangul characters. I'll finish mastering these diphthongs. And I'll make a fresh batch of flashcards to see me through until Friday's lesson.